Summary
This article provides two simple and effective methods to disable WP-Cron, thereby improving your website’s speed: by modifying the wp-config file and by configuring settings in your host’s control panel.
| Description | Feature |
| WP-Cron | Cron Job |
| DirectAdmin, cPanel | Control Panel |
| wp-config file settings | Configuration |
What is Disable Cron Job in WordPress
If you are managing a resource-intensive WordPress site and experiencing slow page loading times, WordPress’s internal cron system, WP-Cron, is likely contributing to your server’s overhead. This article will guide you step-by-step through the process of Disable Cron Job in WordPress and replacing it with a true cron job, which is scheduled directly by the server. Implementing this change will significantly enhance page loading speeds for your users.
- This method uses code within the configuration files.
- It ensures the site remains fully functional without any disruptions.
Why Should We Disable WP-Cron
- Dependency on User Visits: By default, WordPress executes the wp-cron.php file every time a visitor accesses any page on your website. This means that if your site has low traffic, scheduled tasks might not run on time.
- Additional Server Load: For websites with high traffic or numerous scheduled tasks, these frequent executions of wp-cron.php can consume excessive server resources, leading to performance degradation.
- Inaccuracy in Scheduling: Without consistent user visits, critical cron jobs—such as sending automated emails or clearing cache—may experience significant delays, impacting the timely execution of essential website functions.
- Achieving Optimal Performance: By Disable Cron Job in WordPress and delegating these tasks to the system’s native cron, you gain more precise control over execution times, leading to more efficient resource management and improved overall site performance.
Steps to Disable Cron Job
Editing the wp-config.php file:
Navigate to the main WordPress installation folder and open the wp-config.php file using your hosting provider’s File Manager.
Adding the Code Snippet:
Before the line that states “That’s all, stop editing! Happy publishing.”, insert the following code:
/** Disable Cron Job */
define(‘DISABLE_WP_CRON’, true);
(Note: The original text mentions a right-to-left issue with semicolons after parentheses, which is a formatting quirk in themplate text editors and not relevant to the code itself.)
Setting Up Cron Job in DirectAdmin
Step 1: Accessing the DirectAdmin Panel:
Log in to your DirectAdmin panel and navigate to Advanced Features → Cron Jobs.
Example Command for Cron Job
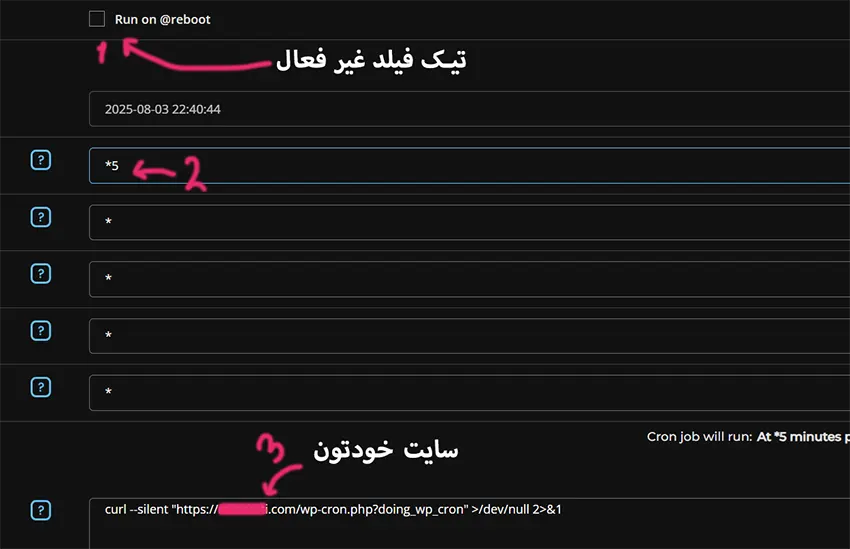
curl –silent “https://yourdomain.com/wp-cron.php?doing_wp_cron” >/dev/null 2>&1
curl --silent "https://XxXxX.com/wp-cron.php?doing_wp_cron" >/dev/null 2>&1
(Replace yourdomain.com with your actual domain name.)
Step 2: Configuring Scheduling Fields
Understanding the “Run on @reboot” Field
This option is designed to execute a command only once immediately after a server restart (manual or automatic). However, for WP-Cron, this is not necessary. Since our goal is to run the cron job every 5 minutes, you do not need to select this option.
Step 6: Adding the New Cron Job
Click the “Add New Cron Job” button to save and activate your newly configured cron job.
Setting Up Cron Job in cPanel
Step 1: Logging into cPanel
Access your cPanel account.
Step 2: Navigating to the Cron Jobs Section
From the cPanel main page, locate the Advanced section and click on Cron Jobs.
Step 3: Configuring Alert Email (Optional)
At the top of the page, you will find a field to enter an email address. If you wish to receive email notifications when cron jobs are executed, enter your email here. Otherwise, you can leave this field blank.
Step 4: Setting Up Scheduling
In the Add New Cron Job section, select “Every 5 Minutes” from the dropdown menu.
(Note: The process is very similar to configuring cron jobs in DirectAdmin.)
Key Considerations:
Beyond the email setting, you might encounter options to enable/disable logs or change the Shell. However, the primary configurations involve the time fields and the Command box. If you encounter an error during saving or see unfamiliar options, it is often sufficient to leave the Email field blank and redirect all outputs to /dev/null.
Setting Cron Job to “Every 5 Minutes” or “15 Minutes
“Every 5 Minutes” is Recommended
- Greater Stability and Accuracy for WordPress Cron Jobs: In WordPress, cron jobs are crucial for tasks such as
- Sending automated emails
- Publishing scheduled posts
- Clearing cache or database entries
- Executing tasks for various plugins (e.g., WooCommerce, contact forms)
- Plugins Expect Continuous Execution: Many WordPress plugins (such as WP Mail SMTP, backup plugins, and Rank Math) are designed with the expectation that their cron jobs will run frequently, often every 5 minutes or less. If the cron job is set to run only every 15 minutes, tasks requiring prompt execution may accumulate or be missed, potentially leading to functionality issues.
external source😒
Cron Job Error Message
If you encounter an error after following these setup steps, it is likely due to an unsuitable host configuration. The recommended solution is to contact your hosting provider’s support team. They will be able to diagnose and resolve the issue about Disable Cron Job in WordPress
Once everything is correctly configured, WordPress cron jobs will be executed by the system’s cron, rather than relying on user visits.
More Free Tutorials: Corporate Website Design


یک پاسخ
the guide is very perfect!